Here you will find all the information you need to build a bi-directional S/PDIF coaxial to optical converter.
| Introduction |
Ever since I got my SoundBlaster Live! soundcard, I wanted to connect it to my Sony MiniDisc recorder in order to bypass the soundcard's internal digital to analogue and analogue to digital converters (the ones in the MiniDisc recorder are of much better quality). However, as you probably guessed, the digital outputs on the SBLive are coaxial, and the ones on the MiniDisc are optical. So I sent e-mails to Sony and Creative asking what I could do, and, predictably, Sony didn't answer at all and Creative, who obviously didn't understand my question, sent me back a load of crap!!! Upon this deception, I decided to make my own converter, of which the hardest part is to lay ones hands on the following TOSLINKs:
* the transmitter TOTX173 (or TOTX176)
* the receiver TORX173 (or TORX176)
Thankfully, I've found a supplier in England, and you can visit his Web site here:
http://www.sc-elec.demon.co.uk
| Step One |
If you haven't done so already, you will need to order up the two TOSLINKs (or just the TOTX173 if you only want to convert coaxial into optical).
All of the following components are required for the bi-directional S/PDIF converter, if you plan to build a unidirectional converter, you will not need all of them.
| Components | Quantity | Comments |
| Integrated circuits | ||
| 74HCU04 | 1 | You must buy exactly this one (with the HCU), otherwise the converter might not work. |
| L7805CV | 1 | Just a 1A voltage regulator, which will allow you to power the converter from any power supply. |
| Diodes | ||
| 1N4001 | 1 | Used to protect the unit against inversed polarity. |
| LED | 1 | Used to indicate whether the converter is on. Can be any colour you like. |
| Resistors | ||
| 4.7ohm | 1 | |
| 75ohm | 1 | |
| 100ohm | 2 | |
| 330ohm | 1 | |
| 1kohm | 1 | Provides power for the LED |
| 8.2kohm | 1 | |
| 10kohm | 2 | |
| Capacitors | ||
| 47nF | 3 | |
| 100nF | 2 | |
| 10uF | 2 | |
| Various | ||
| 47uH choke | 1 | |
| IC socket | 1 | 2*7 pins. Avoid soldering the chip directly on the board |
| Phono sockets | 2 | For the coaxial ins and outs, you'll need these PCB mounting sockets |
| Power connector | 1 | For connecting the power supply to the converter. See text |
| Mains adapter | 1 | Any DC power supply from 8 to 20V should work. |
| Box | 1 | 56mm(width)*105mm(length)*35mm(height) dimensions would be ideal |
| Step two |
So you've got all the bits together and you're ready to get started... Provided below are all the circuit diagrams for the converter. I have personally tested all of them and can assure you that they all work.
![]() The power supply
The power supply
The TOSLINKs require a +5V (+/- 0.25V) supply voltage, and since the mains adapter you are using is very unlikely have exactly the correct output, I have chosen to integrate directly into the module a voltage converter. Here is the schematic:
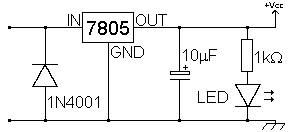
The diode protects against accidental inversion of the mains adapter without causing the undesired 0.6V voltage drop. The 7805 provides a stable +5V output which is decoupled by the capacitor. Finally a LED indicates the active state of the unit.
![]() The coaxial to optical converter
The coaxial to optical converter
And here's the diagram:
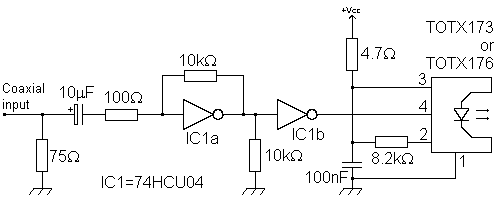
I won't attempt to explain how it works as I'm sure nobody is really interested, all I can say is that it works perfectly!!!
![]() And what you've all been waiting for: the optical to coaxial converter
And what you've all been waiting for: the optical to coaxial converter
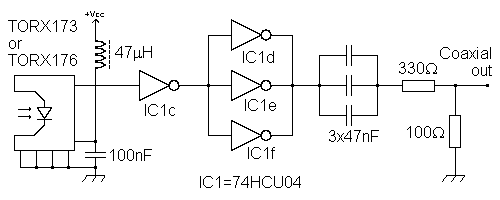
Note: some people have come up with the great idea of using 5 inverters in parallel whereas I've used only 3. The reason behind this is that it allows me to build the whole circuit (emitter and receiver) using one 74HCU04 chip, with no deterioration of signal quality. Now isn't that brilliant?
| Step three |
Now this is where things start getting exciting: since I've already made the bi-directional converter on a printed circuit board (PCB), I've got the layout, and you can view it by clicking here.
You'll need to print it out on some transparent material. If your printer can print directly on plastic, that would be ideal, otherwise you can use tracing paper. Remember that when you print the board, it must be the same size as the original, otherwise, some of the components (IC, TOSLINKs...) won't fit anymore!!! The distance between two adjacent pins of the 74HCU04 must be 2.54mm.
| Step four |
So you've printed the layout out, you've made the PCB (I might consider putting a little lesson online to help people with this), you've drilled the holes and now you're ready to mount the components on it, and you're probably wondering where they go. You can view the component layout by clicking here.
When soldering, try to keep it neat, avoid soldering the 74HCU04 directly on the PCB in case it should need to be replaced, observe the polarity of the following components:
![]() LED
LED
![]() 1N4001
1N4001
![]() 7805
7805
![]() The two 10uF capacitors
The two 10uF capacitors
Solder two wires onto the circles marked + and - on the layout diagram and solder them onto the power connector, I recommend the type of connector used on electronic keyboards or calculators.
| Step five |
All done? Check the circuit thoroughly and when you're ready, connect the power supply to the power connector, making sure the polarity is correct. If all is well it should work first time.
If it works, you'll need to put it in a nice shiny box, when I get round to it, I'll probably put some photos up to show what my one looks like.
If you have any problems, you can e-mail me here.